Hi, I'm Sorry If This Has Been Asked Before, But I Adore Your Arcana Style Cgs And I Was Wondering If
Hi, I'm sorry if this has been asked before, but I adore your arcana style cgs and I was wondering if you had any tips for replicating the arcana style?
m, this is a bit tricky to answer because I’m not confident enough in how I draw the style to make any sort of guide. But in trying to replicate it, I kind of noticed some things?
Note: I like to learn styles through deconstruction and looking at processes. I recommend watching the CG timelapse at 0.25x speed here (x) and looking at some of the CG process/concept art here (x)
Please forgive the rambliness of this under the cut. These are just the notes I make to myself when I try and figure out a style.
Czytaj dalej
More Posts from Nastysynth and Others
I have no Idea how many people know this but its a life saver

Start off with a crappy scanned/phone taken picture like so

Mess around with the SAI Filters, I usually go color deepen all the way to the left then mess with brightness and contrast until I find a good balance I like, then to top it off with a copied layer on multiply to make the lines darker

Click what I boxed off and the magic has already happened

you now are left with a clean lineart layer that you can color underneath to your liking : 0 Hell you can even color your lines however you want as well for a colored lineart
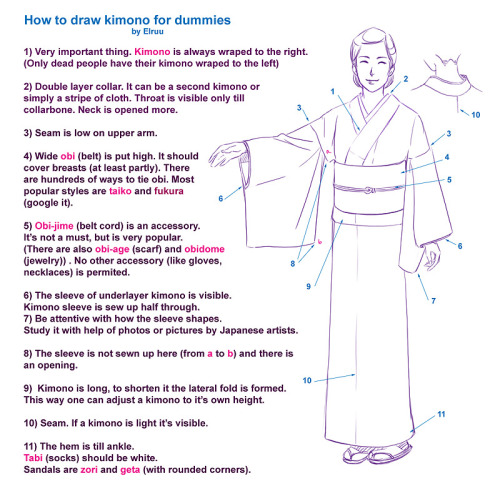

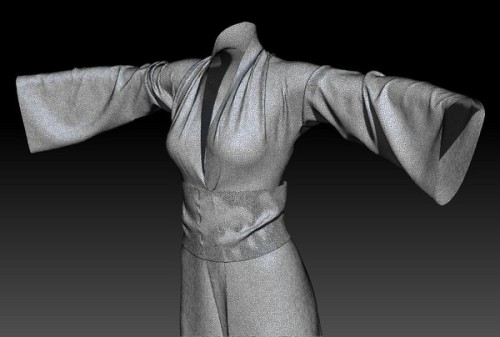


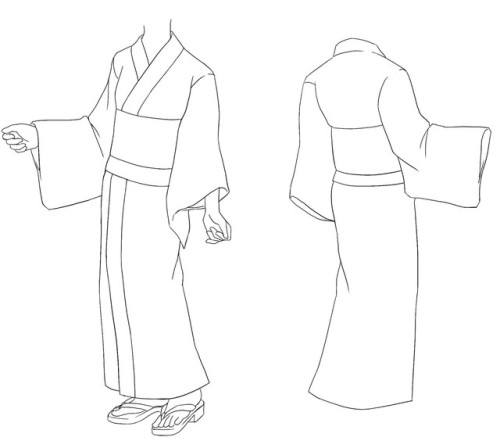
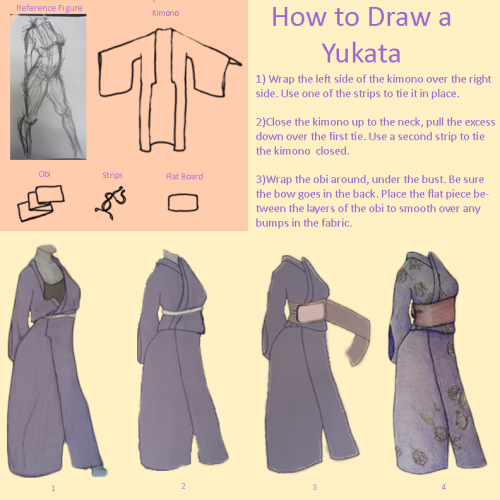

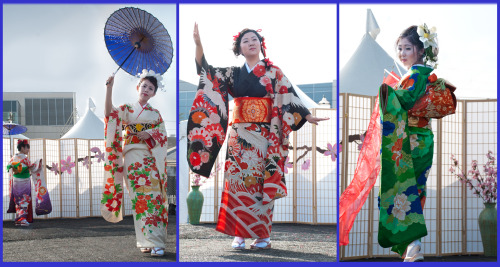

An glorious fuck-ton of kimono/yukata (for females) references.
Yes, the last one is in Japanese… hopefully you’re fluent. And, for the longer images, you gotta reverse-image search ‘em to see the text.
[From various sources]
Sorry, if you've answered this before, but do you have any tips on drawing mouths and lips?
Hello anon! :D I’m not the best at making tutorials and giving tips but I’ll do my best to answer your question! ^^
I sure do love drawing lips! It might be in fact my favourite part of the face to draw.
Let’s see what makes them so irresistible ;)

tip 1: let them shine! that tiny shiny spot does wonders for the lips - it makes them fuller, softer and more three dimensional. It also makes the lips look slightly wet. Sexy!
tip 2: Build the depth with some darker spots. Quirking corners are great for that, and if you make the darkest spot in the middle of the mouth it seems like it’s about to part. And maybe whisper something seductive ;)
tip 3: The very middle of upper lip is my favourite area, it gives the mouth its distinct character. It’s also a great spot to play with shadows, one lighter stroke, one darker stroke and you have a very dramatic shading going on!
tip 4: When drawing lineart it’s good to keep the line varying in width and pressure. Equally thin, flat line might look good in anime, but even there it’s rarely the case. Making the line thicker in the shadowy part of the mouth adds depth to your drawing.
General remarks:
I almost never outline the upper lip, it tends to look weird. Just a thin “U” shape in the middle is usually enough.
Upper lip is usually in the shadow, at least half of it. Lower lip tends to catch the light, especially with pouty plump lips. The more shadow you add under it, the fuller the lips look.
When drawing male characters I usually play around with skin tones instead of pink and red (see the third row of examples). But it’s not a rule. Some boys rock them rosy lips. ;)
Never paint the teeth white, never. Gray, yellowish and pinkish tones are great.
And the final tip: use reference! Look for pictures of people with beautiful lips, with thin lips and full lips, try to see which line goes where and how it changes the shape and expression. I hardly ever draw without a reference.
Good luck! 👄


animation run cycle notes for my upcoming 2D animation video course package

i am SO sorry for the super long response, but i thought this might make a nice little tutorial opportunity, since soft body physics can be… frustrating, to say the least. i’ve noticed that it tends to respond better to spherical meshes than most others, so getting it to work with something with a lot of hard edges and flat planes can be a little tricky (at least in my experience).
so! to get started, here’s my basic setup

the only thing i’ve done so far is place my object in the scene, along with a plane to act as the ground and a camera to record everything.
next you want to select your object, and in the properties menu on the right, select the physics tab (should be the very last one, the icon looks like a bouncing ball)

and for your object, you want to apply a collision and a soft body modifier (some people use rigid body instead of collision, so if you have issues with one there’s a chance the other might work out better. as for me, i usually stick to collision)

then select your plane and apply the collision modifier only.
now when you hit the play button at the bottom of the screen, this happens

it’ll just kinda float in place.
so to fix that, you select the object, go back into the physics menu, and look at its soft body settings

now uncheck the box that says “Soft Body Goal” (this’ll let gravity do its thing)

now when you press play after that

poor dude just kinda dies.
so there are a couple things i like to do to help it not… do… whatever that is.
go back into your object’s soft body menu and click on the tab that says “Soft Body Edges”

now underneath where it says “Collision:” you want to make sure that you have either “Edge” or “Face” (or both, why not live a little) applied to the object (this can help prevent clipping!)

we’re trying to make it wiggle n’ jiggle while still maintaining its shape, so what usually works for me is to crank up the “Bending” spring as high as it’ll go (which is 10) and enabling “Stiff Quads”

and we’re left with this!

and that’s how i do it! there are probably more efficient ways to get this effect, but for me

Do you have any tips for drawing in the Pokemon style??
These are just some rough notes. I don’t draw that often in the pokemon style so these are a little more basic than I could give on other styles.
For colouring advice, this is a great resource to use: https://tunnaa-unnaa.tumblr.com/post/162328103349 It goes through the styles of different pokemon artists.

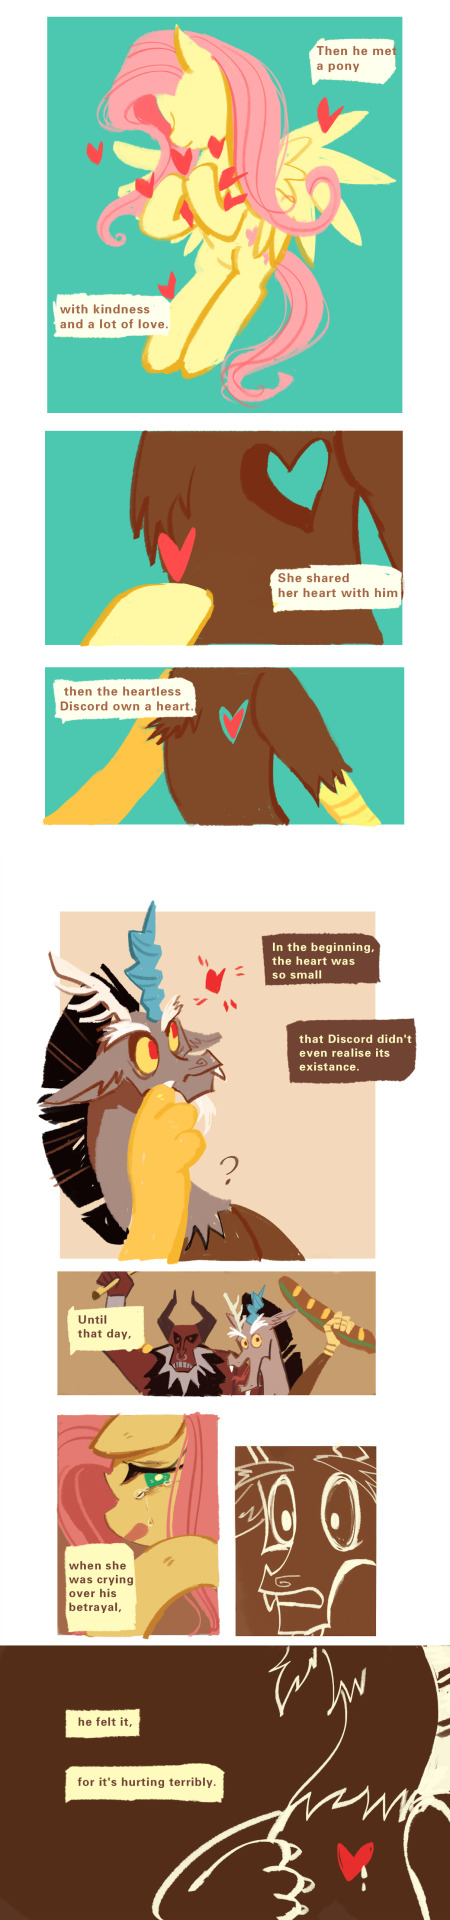

FLUTTERCORD COMIC: <<HEART>>
I’m glad that I can finish this on time.
Season 9 is over, but I know their stories will not stop.
I love them forever.It’s like I know they’ll always love each other.
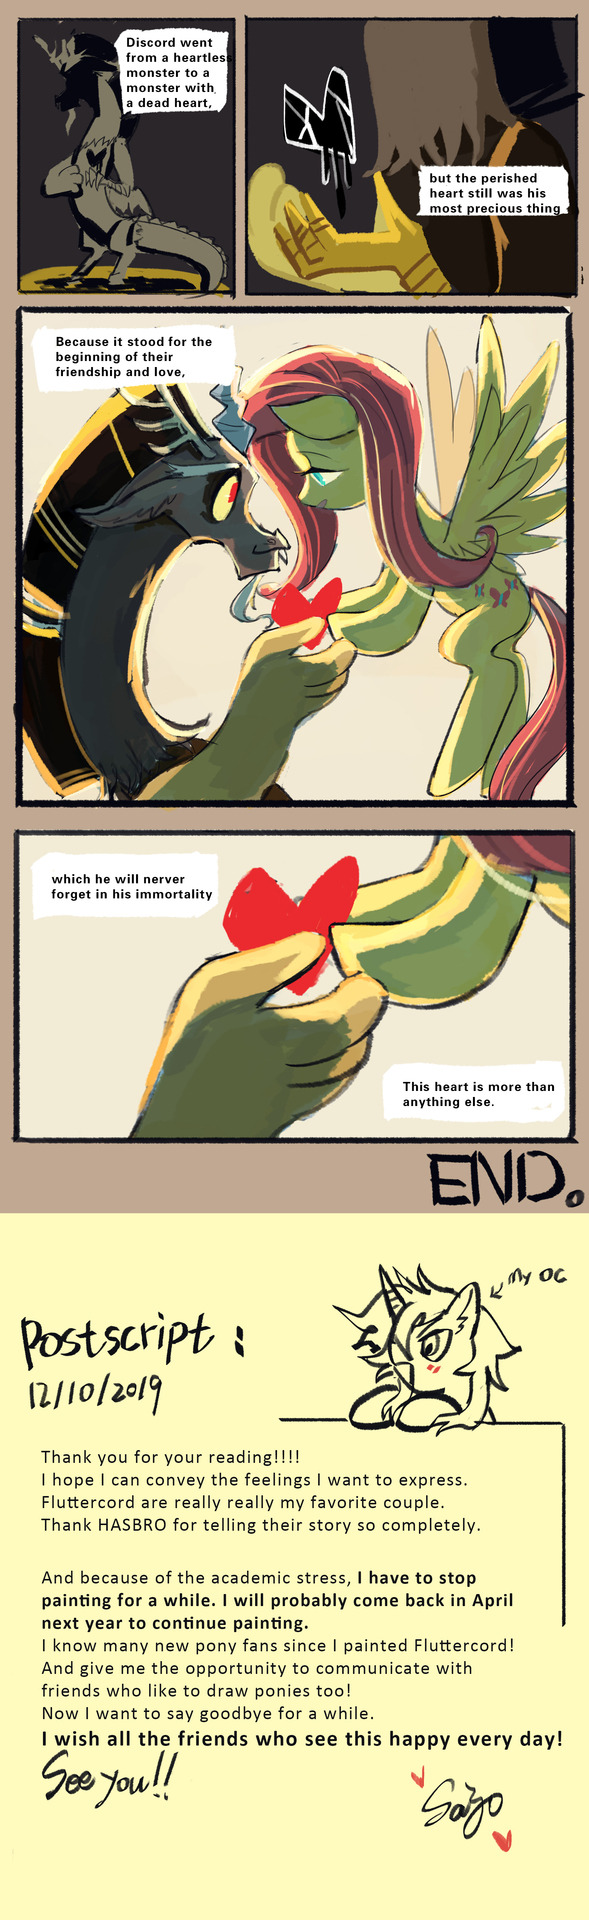
And now I have to stop updating for study.
I’ll be back in April next year to continue drawing. See U!!!!!
How do you draw noses?
I’m not sure what specific part you’re wondering about, so here’s a run-through of my process from sketching to painting!
1) The first thing I do is simplify the nose into a few basic shapes to get a prism-like block, like so:

2) I can now easily draw the prism shape in three-dimensional space depending on the angle and rotation of the head.

3) Using the guidelines/planes I can draw a proper nose in any angle! There aren’t many tricks or shortcuts for this step, unfortunately (other than practicing lots). I recommend using references, they’re always helpful :)
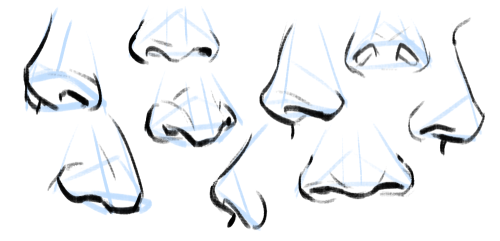
4) Really important to note: all noses vary greatly, especially from different ethnicities! A high-bridge “aristocratic” sort of nose or a ski-slope button nose might be accurate for some people, but definitely not everyone. Compare differences in size, width, a hooked or button nose tip, high or low nose bridge, and so on:

5) Then I paint! I have a skin tone tutorial here, if it helps. Take note of the lighting, skin tone, etc. Here are some things I keep in mind:
For pale skin tones, the nose sometimes has a redder colouration than the rest of the face because of increased blood flow.
The nose also usually has highlights (due to oil). These are located on the tip of the nose, the nostril groove, and where the base of the nose meets the flat area of skin around it!

Hope this helps! In the end, all stylistic choices are completely up to you. Art’s subjective, so feel free to draw any noses you want :)
Quick art tip - child proportions
Ok this is a real quick one but let me show you how to get more-or-less accurate sizes for child characters. Kids are tricky to draw, they are - from toddler up to about teens people change radically almost every year so pinpointing character’s size during those years is pure hell.
What you need to do to make everything super easy for yourself is to check their Head Proportion. What makes kids look like - well, kids, is that their heads are proportionally large in comparison to their body.
Average adult is about 7,5 heads tall in comparison to their own body, however with children under 10 that number is just under 6 heads with about 1 head shorter the younger you go down to 3 heads as an infant.
Easiest way to figure the so-so head-height of a certain age is to find images of said age group and do a quick count on them

at which after you can replicate it in your own works - don’t mind if it’s not 1:1 with reference, finding images that are actually of the age you need is tricky and kids in general vary a lot so someone might be a lot taller than others. You have a bout 0,5 -1 heads of wiggle room before it starts to look way older.


Proportions are super important in art and i lovingly recommend everyone to figure out basics of them - it’s the easiest way to get notifically better with art. I could go on about proportions but let’s wrap this up. Need to note however that head proportion is not same as character height - a character can be 15 feet tall but still have head-height of 6, HH is simply a way to scale out the body.
How to “Stained Glass”, Part 1: Lineart
Since I was asked how I do my stained glass look, I’m making this little tutorial to give y'all some pointers, so you too can make art that looks like this:

Broken up into two parts: Lineart and Coloring
Part two will follow soon!
[Read more for lenght also my first language is not english, but I hope everything is understandable!]
Czytaj dalej
-
 cyb-rdva liked this · 3 weeks ago
 -
 sophiiibeee liked this · 1 month ago
 -
 sophsoap liked this · 2 months ago
 -
 daianymends liked this · 3 months ago
 -
 baby-a-in-trenchcoat liked this · 4 months ago
 -
 crackheadwhohashadenough liked this · 4 months ago
 -
 macabremayhem liked this · 8 months ago
 -
 macaroniguardian liked this · 8 months ago
 -
 hollowphoenix27 liked this · 9 months ago
 -
 signmyst liked this · 9 months ago
 -
 perfectlyfreerebel liked this · 10 months ago
 -
 jacereaall liked this · 10 months ago
 -
 xeas-niamh reblogged this · 11 months ago
 -
 mysticalpruneflapshepherd reblogged this · 11 months ago
 -
mysticalpruneflapshepherd liked this · 11 months ago
-
 a-living-n1ghtmare liked this · 11 months ago
 -
 starflos liked this · 11 months ago
 -
 tsukiakaridowntime liked this · 11 months ago
 -
 stickystickyduck liked this · 11 months ago
 -
 ribbit-r liked this · 11 months ago
 -
 yaaqu3 liked this · 11 months ago
 -
 constellation-chondrichthyes liked this · 1 year ago
 -
 charmander-warrior-66 liked this · 1 year ago
 -
 happy-bookworm liked this · 1 year ago
 -
 fazdeeznuts liked this · 1 year ago
 -
 artking-4 reblogged this · 1 year ago
 -
 psych0mantl5 liked this · 1 year ago
 -
 starry-night-rose liked this · 1 year ago
 -
 vast-error-404 liked this · 1 year ago
 -
 cakeiddy liked this · 1 year ago
 -
 gh0st0rch1d liked this · 1 year ago
 -
 agent-liv liked this · 1 year ago
 -
 ecospie liked this · 1 year ago
 -
lackytacky liked this · 1 year ago
-
 snobgoblin reblogged this · 1 year ago
 -
snobgoblin liked this · 1 year ago
-
 natawoots liked this · 1 year ago
 -
 otuli liked this · 1 year ago
 -
 your-grace-the-raven-queen reblogged this · 1 year ago
 -
your-grace-the-raven-queen liked this · 1 year ago
-
 have-a-g00d-day liked this · 1 year ago
 -
 writerohno liked this · 1 year ago
 -
 greyed-rabbit liked this · 1 year ago
 -
 gh0stz404 liked this · 1 year ago
 -
 saturniere liked this · 1 year ago
 -
 paulisfreakingdead liked this · 1 year ago
 -
 mana-fae liked this · 1 year ago

Sylwester | i will mostly post sketches, because i'm too lazy to end them
196 posts